

No, my title isn't actually referring to 2014, but it may as well be. You guys, I had a wonderful 2014. Though one of the less eventful of recent years, it still did consist of one move, one wedding, and the best visit home I've ever had. I hope you guys are looking forward to what 2015 has in store.
And I hope you're still sticking to your resolutions by the time you read this! My only resolution is to be more consistent in blogging. So far, SO GOOD!
With all the holiday time off, we've actually had time to tackle some projects around here. It's hard to prioritize projects, so there are probably some we should have been focusing on instead... like our torn-apart kitchen, or getting some type of flooring in the bedroom... (yep. That's still plywood.)

But no! This is the story of our newly constructed dining table. Which really only got done because we had people coming over on NYE, and needed a game table. (We learned to play Settler's of Catan! Maybe we're about 10 years late on that, but better late than never! We are really, really bad.)
NYE was 30 degrees here. So building it took literally the entire day, because I needed a 10-minute warm up break every 10 minutes.
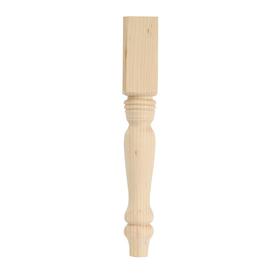
We bought these table legs from Lowe's ($15 ea) because they matched the style of the chairs we bought (in white) from World Market pretty closely.

We just kind of made up the table. Our dimensions ended up being 29" x 60" x 29.75", which is very close to the standard dimensions of 30" x 60" x 30".
For the top, we used 4 planks of 1x8 with 1x6 at the ends. We just Kreg'd them all together, but we could NOT get it level. We've had issues doing this before, but this was by far the worst - no amount of sanding could fix it.
(I was frozen solid and have no pictures of this, I so apologize!)
Luckily, my dad gave me and Stephen quite literally a 2 hour tour of the garage when we were home - all his new tools, workstations, etc - and taught us a ton. There is so much to learn. Anyway, he gave me the idea to put intentional grooves between the boards, and you won't be able to tell they aren't really level.

It worked AWESOME. We clamped scrap wood to make a guide for the router, and let her rip.


It actually looks more professional this way, I think!
We decided to do a 2" overhang all around, and cut accordingly. Instead of doing diagonal supports at the corners, we just did 2 across the width of the table, since it wasn't wiggling around.
Of course, we were out of time to stain it by the time our guests came, so it went unfinished for a few days. Plus, it was too cold to stain it (under 40 degrees here).
...at least outside. I got restless and stained it inside, since the smell doesn't didn't really bother me (never again). I did a little test stick for all the different stains I had laying around. Originally I wanted to do Driftwood by Rustoleum, but it was waaaaay too gray (far left).

I ended up doing a mixture of Minwax Weathered Oak, Rustoleum Driftwood, and Minwax Dark Walnut (mixture is the second from the right above).

Since the table and legs are pine, I used wood conditioner...

And just like that, it became my favorite stain.

 |
| I like that you can see the pool in the reflection... green as it is. |
I haven't used poly yet - waiting for a warmer day - but I'm planning on going satin. I love glossy, but I don't want to distract from everything the table already has going for it.

Oh yeah, and did you notice our AWESOME new light fixtures? It's from World Market (but I got it when it was 20% off). We had to offset it, so we used an anchor we had and a hook we had that I painted with black nail polish. The twist tie (from a loaf of bread) holding the unruly wire is about the get the same treatment!

So yeah! The dining room is coming together. One step at a time, folks.
********
PS - I got a new camera for Christmas, which means I can finally get all these old photos onto my computer!!!!! I updated my blog about moving into our house, which includes all the disgusting before photos... Click here for the updated version!
(As Jimmy says, EW!)
(As Jimmy says, EW!)


I had the same problem with the boards not lining up after Kregging although I cut down on some of it by having some giant clamps. I had a real hard time though bc I used 8 boards that were 1X6. My solution was the sand the crap out of it and then leave a couple imperfections.
ReplyDelete